




Artificial Intelligence has transformed how businesses communicate with customers. While chatbots have become common on websites, many businesses still rely heavily on phone calls for customer support, appointment scheduling, sales enquiries, and lead qualification.
Hiring staff to answer every call can be expensive, especially for businesses that operate outside standard working hours. An AI voice assistant can answer calls 24/7, provide consistent responses, collect customer information, and direct callers to the appropriate service without requiring a human to be available for every conversation.
Platforms like Vapi make it possible to build sophisticated AI phone assistants without creating speech recognition systems, language models, or voice synthesis engines from scratch. Instead, developers can focus on designing the conversation, configuring the assistant, and continuously improving the customer experience.
In this guide, you'll build your first production-ready AI voice assistant using Vapi. You'll learn how to configure an assistant, select the right AI model and voice, write an effective system prompt, connect a phone number, test conversations, and refine your assistant using transcripts and call analytics.
What You'll Build
By the end of this tutorial, you'll have an AI assistant capable of:
- • Answering incoming phone calls
- • Greeting callers professionally
- • Responding to business FAQs
- • Explaining your services
- • Collecting customer information
- • Handling interruptions naturally
- • Producing call transcripts and AI-generated summaries
- • Recording calls (optional)
- • Monitoring conversations through the Vapi dashboard
Although this guide uses a business receptionist as the example, the same implementation can be adapted for salons, healthcare providers, law firms, real estate agencies, SaaS companies, restaurants, and many other industries.
Prerequisites
Before you begin, make sure you have:
- • A Vapi account
- • An OpenAI API key (or another supported model provider)
- • A Vapi phone number (or a Twilio phone number connected to Vapi)
- • Basic JavaScript or Node.js knowledge (optional but helpful)
You don't need prior experience with speech recognition or AI voice technologies because Vapi manages those components for you.
Step 1 – Create a Vapi Account
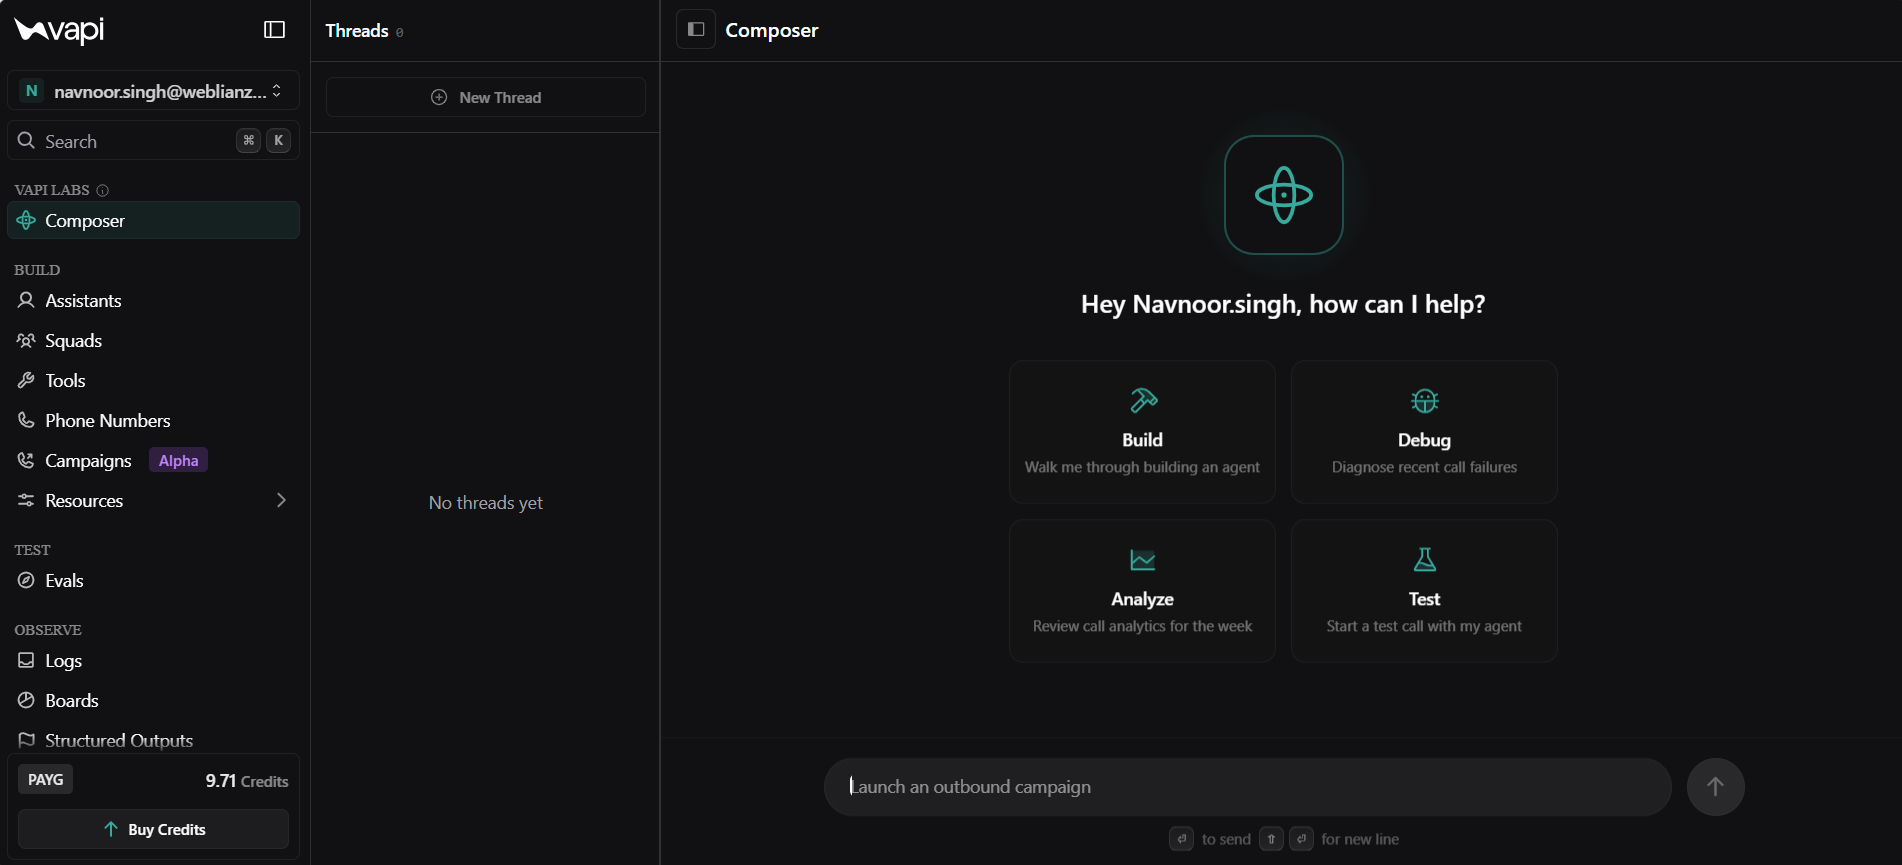
Visit the Vapi website and create a free account. Once you've verified your email address, log in to the Vapi dashboard. This dashboard is where you'll create assistants, manage phone numbers, configure AI models, and review your call history.
The dashboard is organized into several sections, including:
- • Assistants
- • Phone Numbers
- • Tools
- • Resources
- • Logs
- • Analytics
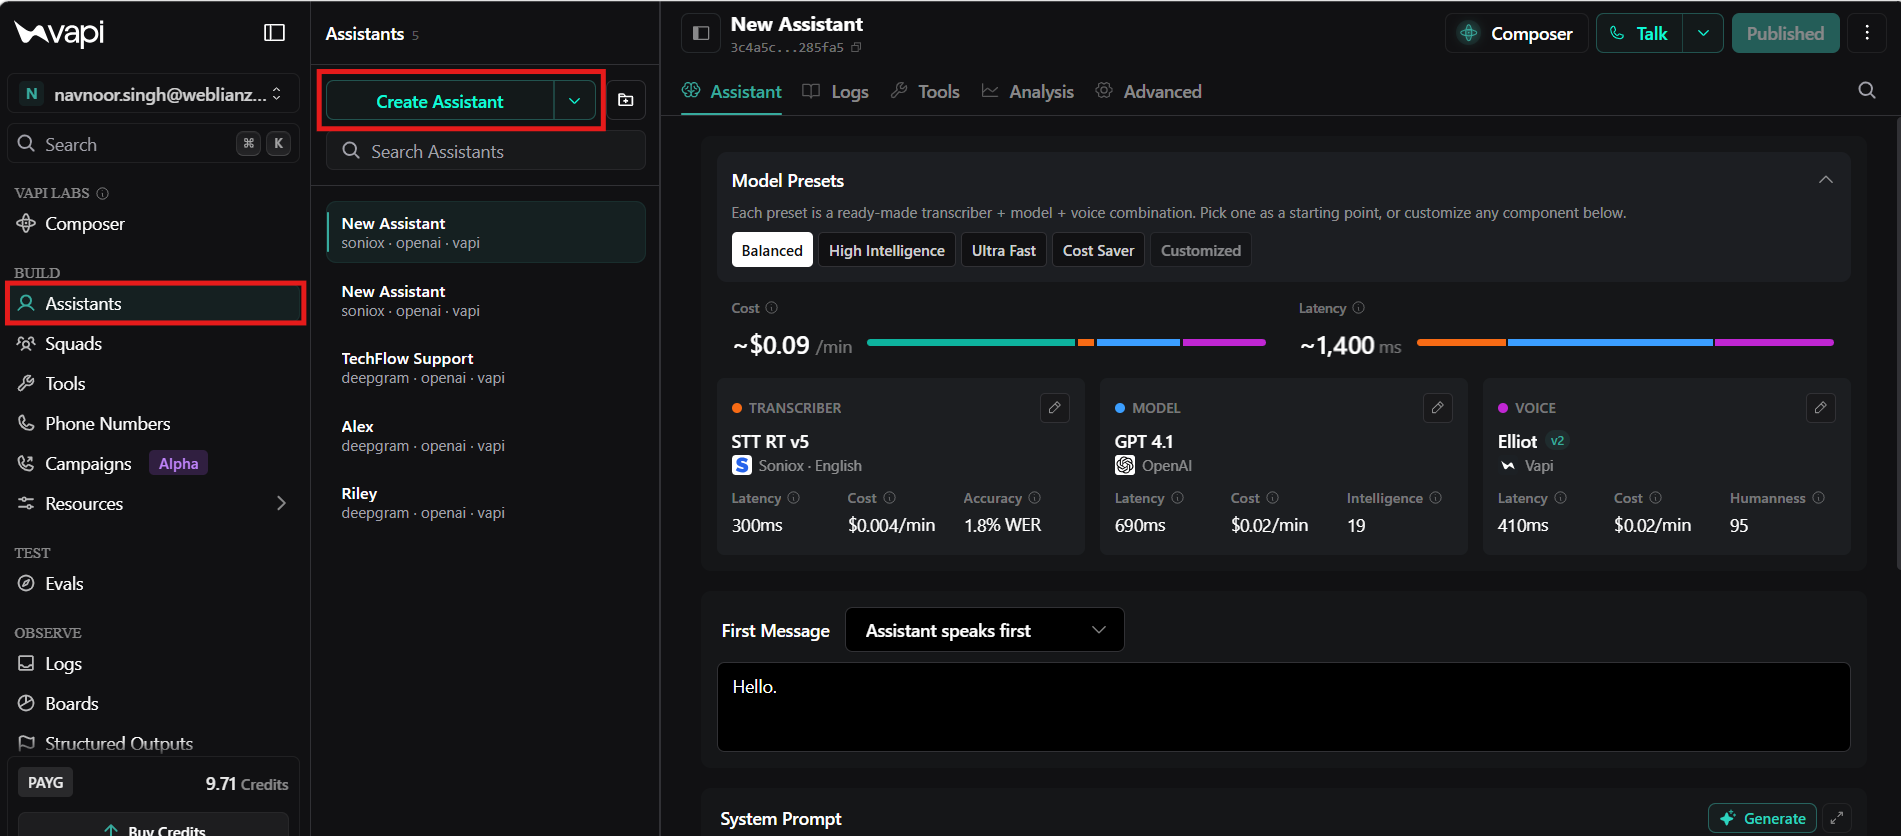
Most of your work throughout this guide will take place inside the Assistants section. Click Create Assistant to begin building your first AI receptionist.
Don't worry about configuring every option immediately. We'll go through each setting step by step and explain why it matters, helping you build an AI assistant that's ready to answer real customer phone calls.
Step 2 – Create Your Assistant
Click the Create Assistant button from the Assistants page. This assistant will act as your AI receptionist and answer incoming phone calls on behalf of your business.
Give your assistant a meaningful name that reflects its purpose. For example:
- • AI Receptionist
- • Customer Support Assistant
- • Appointment Booking Assistant
- • Sales Assistant
A descriptive name makes it easier to manage multiple assistants as your business grows. For example, you may eventually have separate assistants for sales, customer support, and appointment booking.
Vapi provides several preset configurations. For most businesses, the Balanced preset is an excellent starting point because it offers a good balance between response quality, latency, and operating cost.
Step 3 – Configure the AI Model
The language model determines how your assistant understands customer questions and generates responses. Choosing the right model has a direct impact on response quality, reasoning ability, speed, and overall customer experience.
Vapi supports multiple AI providers, including:
- • OpenAI
- • Anthropic
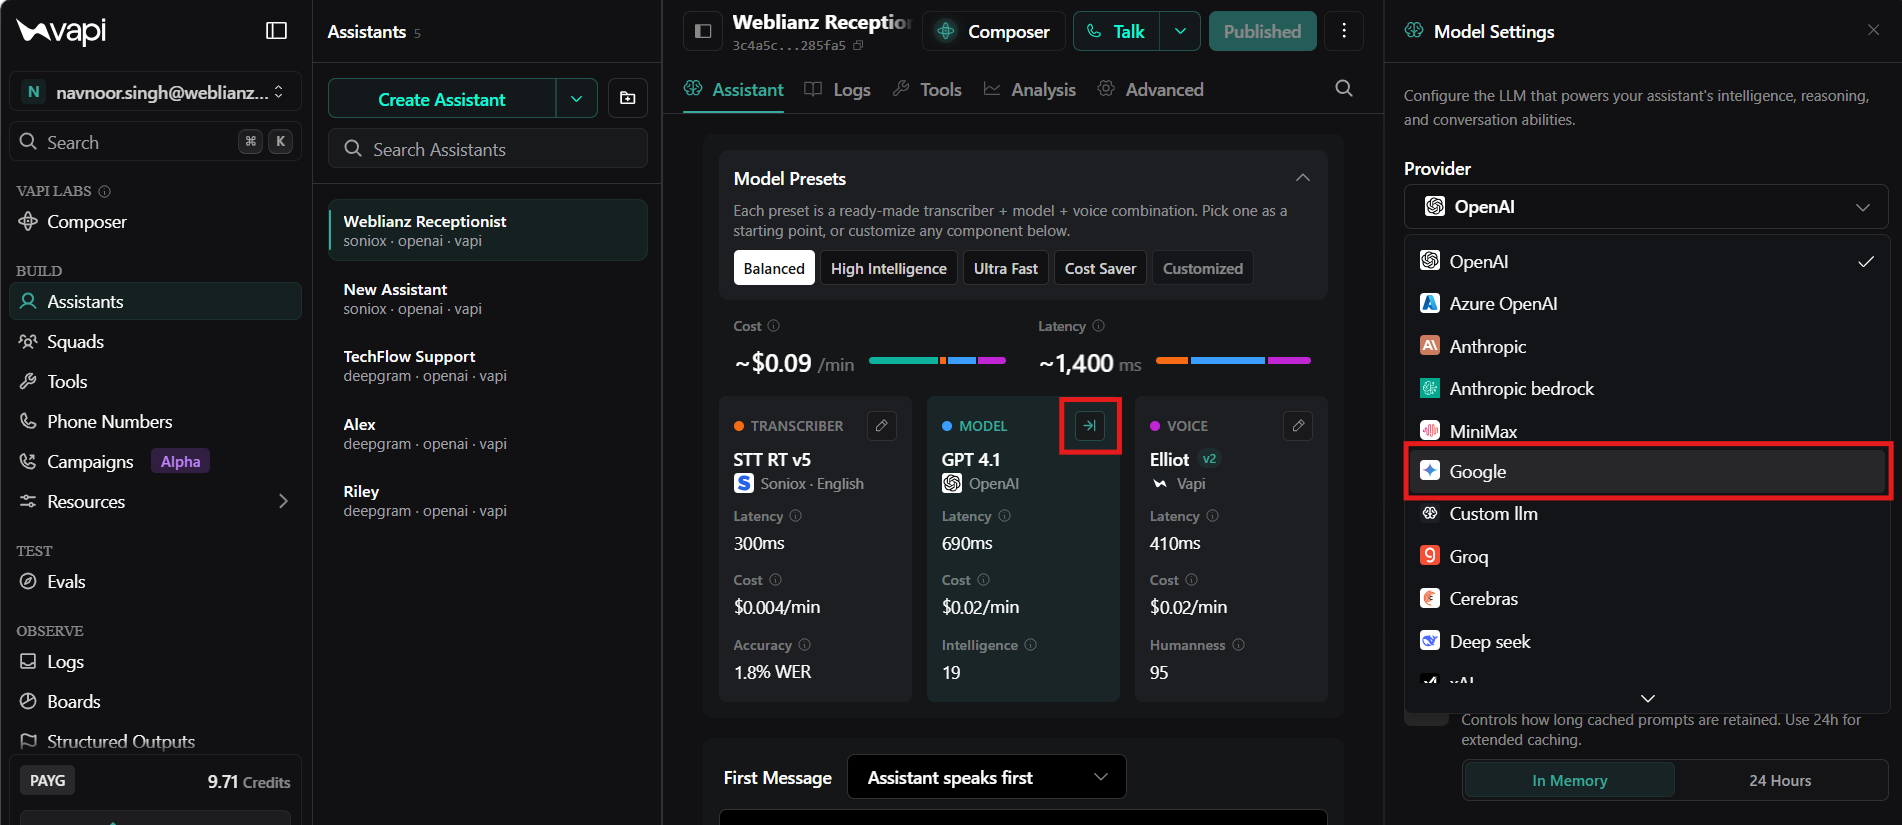
For most business use cases, the following models are excellent choices:
- • GPT-4.1 – Excellent reasoning and reliable conversations.
- • GPT-4o – Lower latency and faster responses for voice interactions.
- • Claude – Performs well during longer and more detailed conversations.
- • Gemini – A solid choice for teams already using Google's AI ecosystem.
When selecting a model, don't focus only on pricing. Consider response quality, reasoning ability, latency, and compatibility with your business requirements. For most beginners, GPT-4.1 provides an excellent balance between conversational quality and reliability.
If you're building your first AI receptionist, keep the default Balanced preset and select GPT-4.1. Once you're comfortable with Vapi, you can experiment with other models to compare response quality, latency, and pricing.
Step 4 – Select a Voice
A natural-sounding voice plays an important role in creating a positive customer experience. Even if your assistant provides accurate answers, an unrealistic or robotic voice can make conversations feel unnatural.
Vapi supports multiple voice providers, including:
- • Vapi Voices
- • ElevenLabs
- • Cartesia
- • Azure
- • OpenAI Voices
When selecting a voice, consider the following factors:
- • Natural pronunciation
- • Speaking speed
- • Accent
- • Emotional tone
- • Response latency
- • Pricing
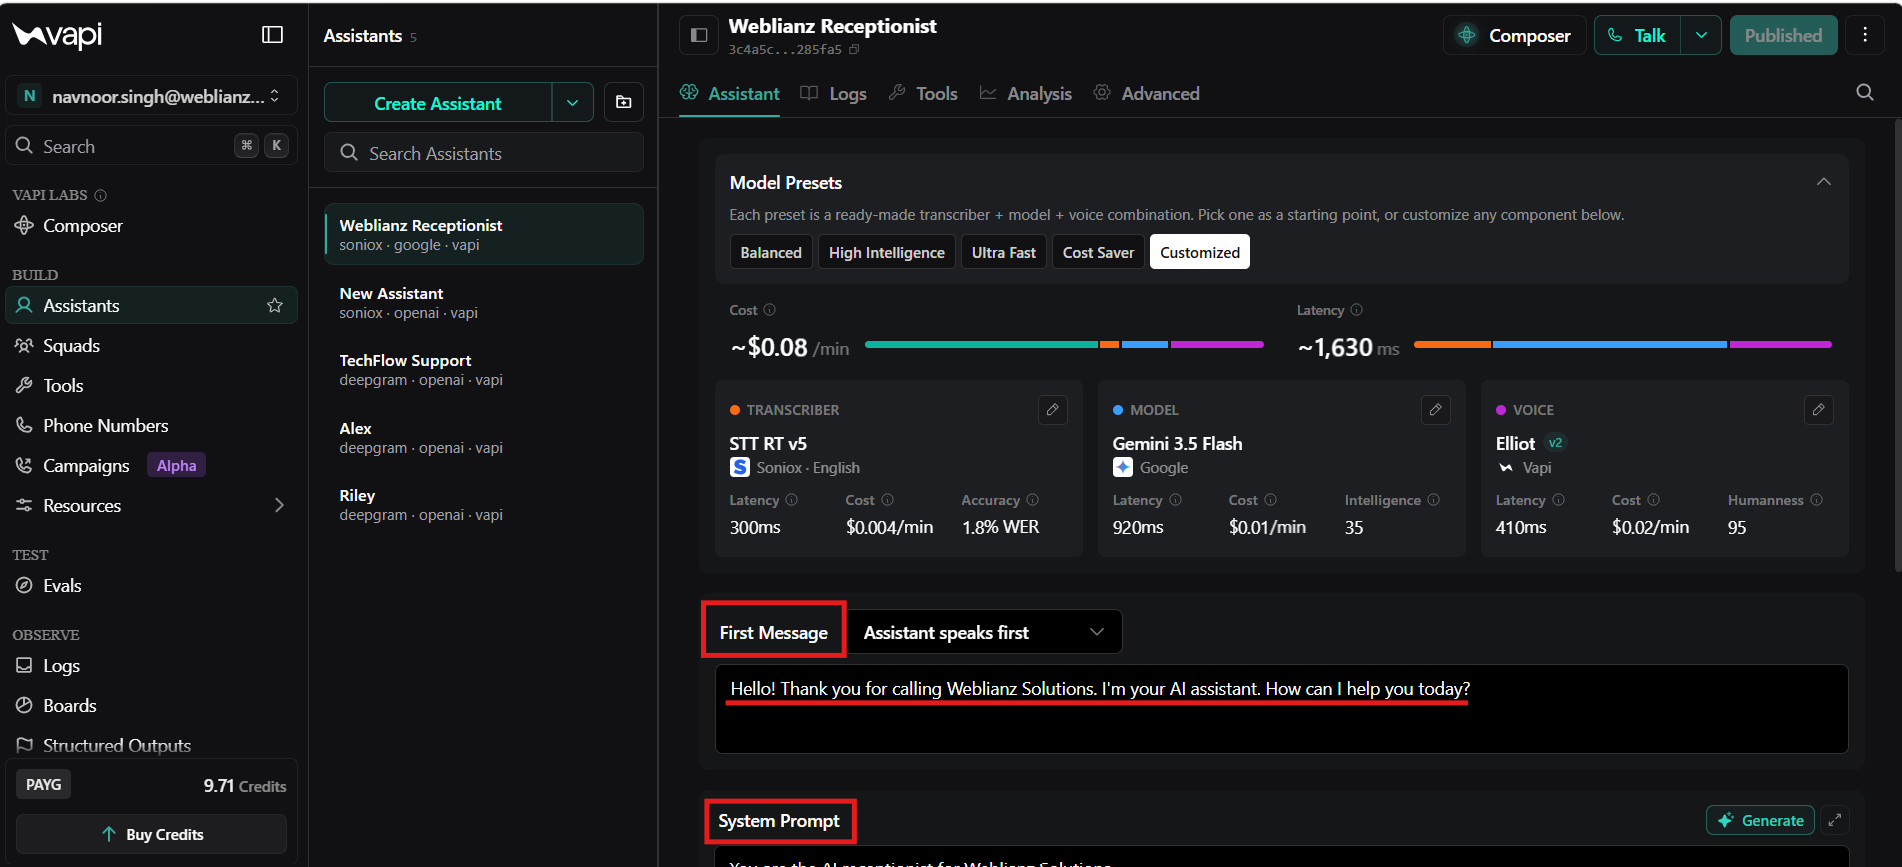
Listen to several sample voices before making your final decision. A voice that sounds impressive during a short demonstration may not be suitable for longer customer conversations.
Step 5 – Customize the First Message
The first message is the first thing your customers hear when they call your business. A professional greeting creates a much better first impression than a simple "Hello."
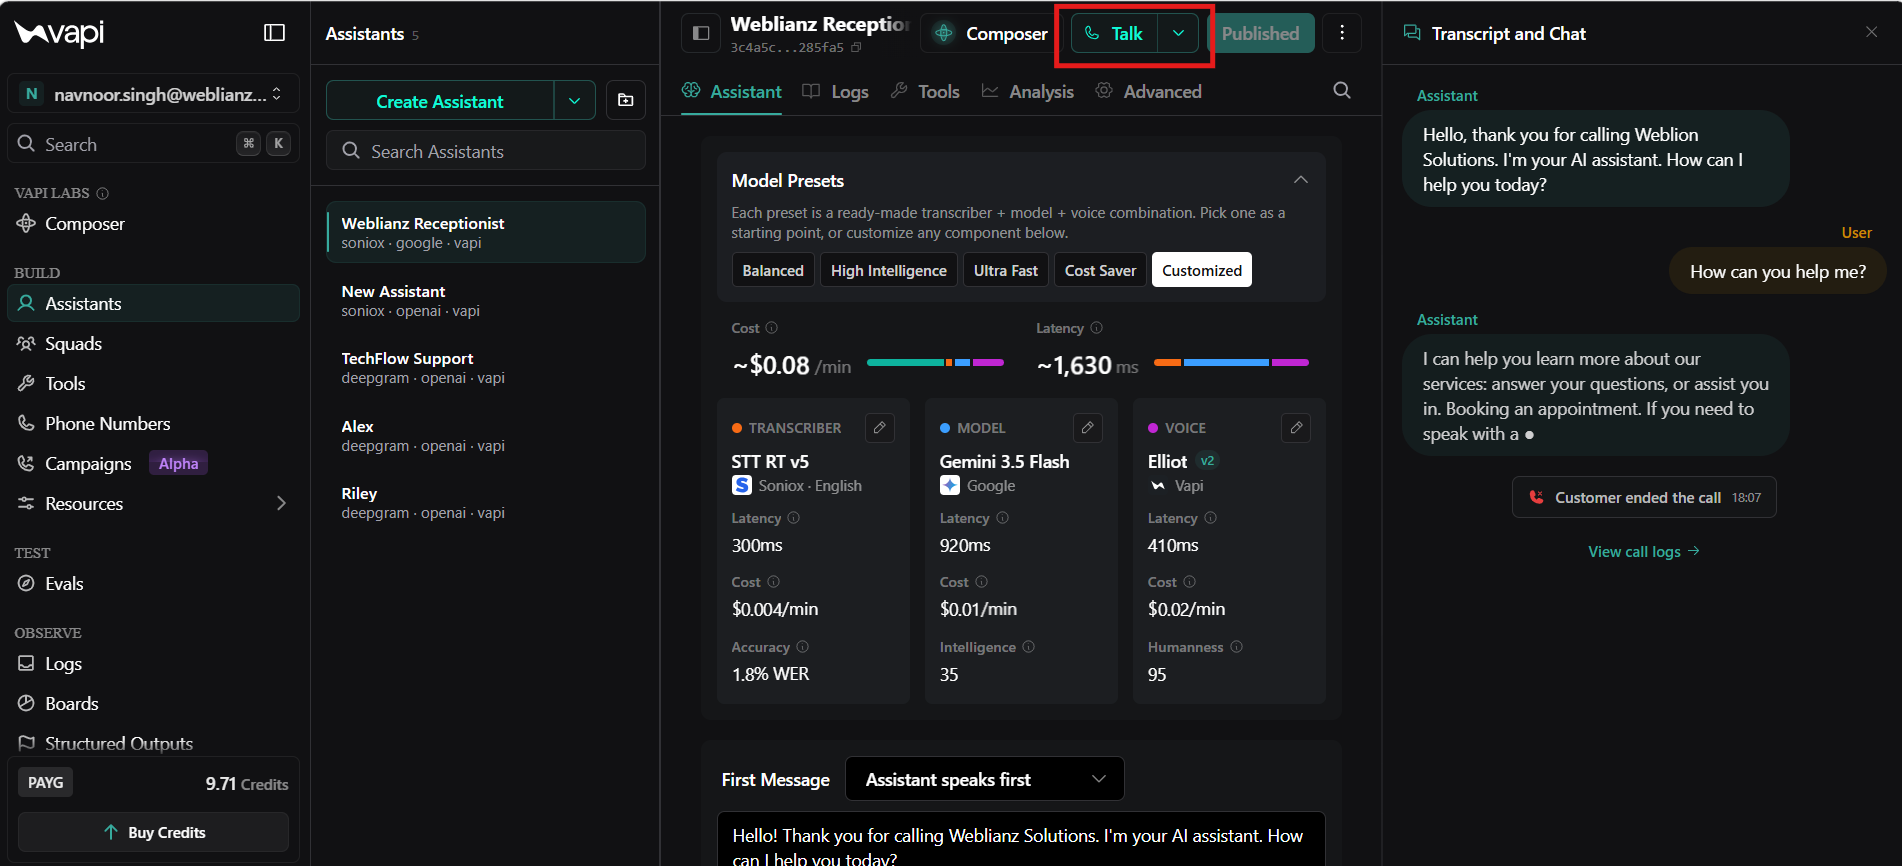
Avoid generic greetings such as:
Instead, use a greeting that introduces your business and lets callers know they're speaking with an AI assistant.
For industry-specific assistants, customize the greeting accordingly. For example, a salon assistant might say:
Step 6 – Write a Production-Ready System Prompt
The system prompt is the most important part of your assistant. It defines the assistant's role, personality, responsibilities, and conversation rules. A vague prompt leads to inconsistent responses, while a detailed prompt helps create a reliable customer experience.
Below is a simple production-ready prompt that works well for most businesses.
You are the AI receptionist for Weblianz Solutions.

Your responsibilities include greeting customers,
answering questions about our services,
collecting customer information,
and providing professional assistance.

Always speak politely and naturally.

Keep responses concise.

Never invent information.

If you don't know an answer,
explain that you don't have enough information
instead of guessing.

Ask one question at a time.

Confirm important details before ending the conversation.

If the customer has no additional questions,
thank them for calling and wish them a great day.
A well-written system prompt should clearly define:
- • The assistant's role
- • Communication style
- • Business rules
- • Escalation guidelines
- • Information boundaries
- • Conversation length
- • Error handling expectations
Take time to refine your prompt after reviewing real customer conversations. Small improvements to your prompt can significantly improve the quality and consistency of your AI assistant's responses.
Step 7 – Test Your Assistant
Don't publish your assistant after a single successful conversation. Testing helps you identify incorrect responses, awkward conversations, and missing information before real customers start calling.
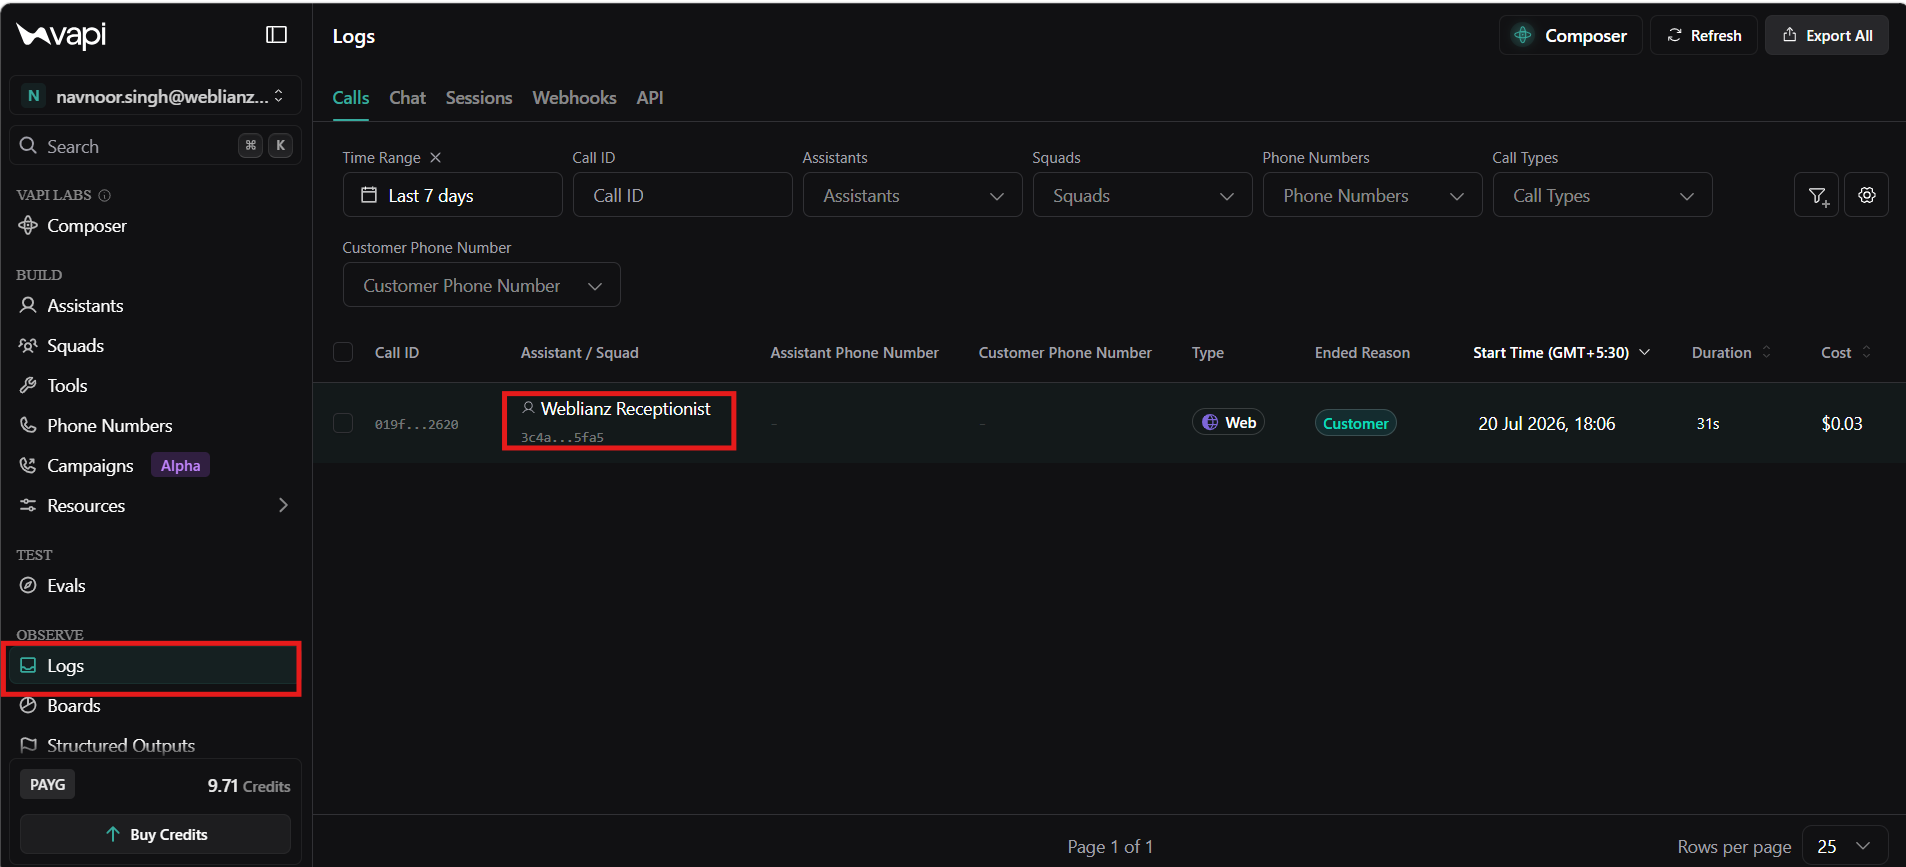
Test a variety of real-world scenarios, including:
- • General enquiries
- • Pricing questions
- • Appointment requests
- • Incorrect information
- • Customer interruptions
- • Long conversations
- • Fast speech
- • Unclear pronunciation
Each conversation helps identify weaknesses in your system prompt and overall assistant behaviour. Testing should be an ongoing process rather than a one-time activity.
Step 8 – Review Call Logs and Analytics
One of Vapi's biggest advantages is its built-in monitoring capabilities. Every conversation provides valuable information that can be used to improve your assistant.
After every conversation, review:
- • Call history
- • Call duration
- • Conversation transcripts
- • AI-generated summaries
- • Recordings (if enabled)
- • Assistant responses
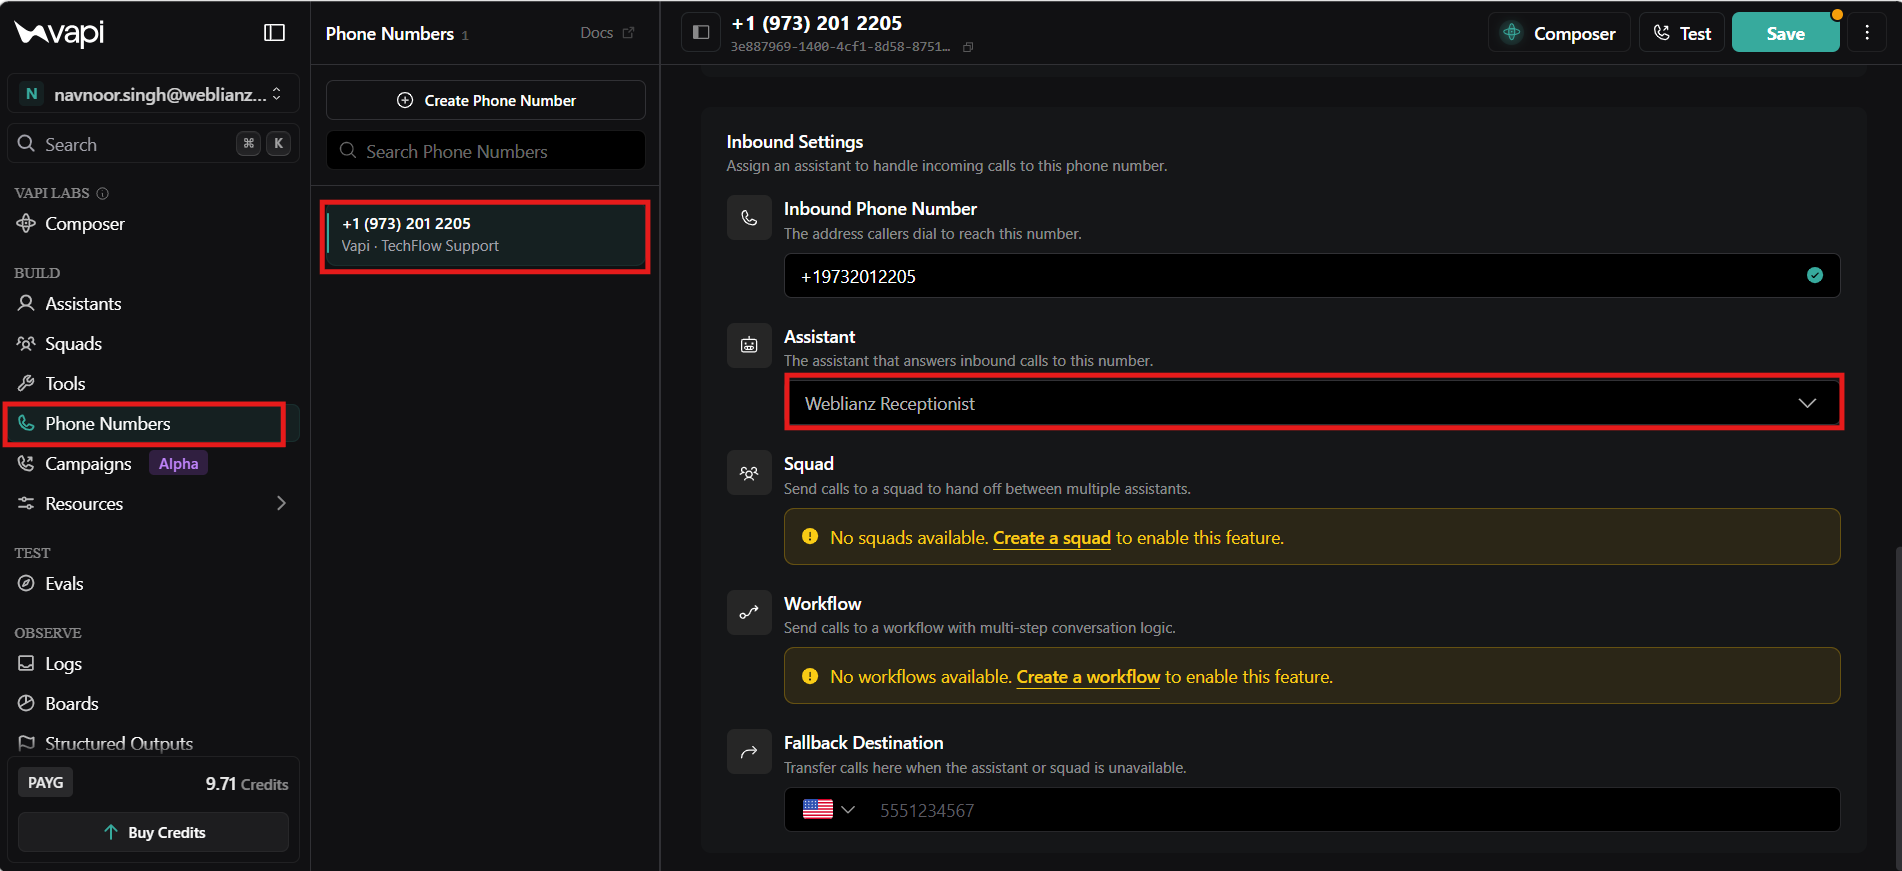
Rather than guessing why a conversation failed, transcripts allow you to see exactly what happened during the call. You can quickly identify missing information, confusing responses, or prompts that need improvement.
Regularly reviewing call history and analytics helps your AI assistant become more accurate and reliable over time.
Step 9 – Configure Your Phone Number
Now it's time to connect your AI assistant to a phone number so it can start answering incoming calls.
Navigate to the Phone Numbers tab from the left sidebar and select the phone number provided by Vapi. If you don't already have a phone number, you can purchase one directly from Vapi or connect your own Twilio phone number.

Under the phone number settings, select the assistant you created earlier from the Assistant dropdown. This tells Vapi which AI assistant should answer calls made to this phone number.
After selecting your assistant, click Save to apply the changes.
If you want calls to be transferred to a real person when required, scroll down to the Advanced section and configure a forwarding phone number. Although this step is optional, it's recommended for production environments where customers may occasionally need human assistance.
Finally, call your assigned phone number or use the Test button to verify that your assistant answers incoming calls correctly.
Step 10 – Continuously Improve Your Assistant
Building an AI receptionist isn't a one-time task. Like a new employee, your assistant becomes more effective as you improve its prompt, review conversations, and refine its responses.
Regularly:
- • Improve your system prompt.
- • Review customer questions.
- • Add missing information to your prompt.
- • Simplify overly long responses.
- • Test different voices.
- • Experiment with different AI models.
Even small improvements can significantly enhance the customer experience over time.
Common Mistakes
Many developers make similar mistakes when building their first AI voice assistant. Avoiding these common issues will help you create a much better experience for your callers.
- • Using extremely short system prompts.
- • Making responses unnecessarily long.
- • Ignoring call transcripts and analytics.
- • Deploying without enough testing.
- • Expecting perfect results immediately.
- • Never refining prompts after launch.
Your first version doesn't need to be perfect. Focus on getting your assistant working, gather feedback from real conversations, and continue improving it over time.
What's Next?
Now that you've built your first AI voice assistant, the next step is enabling it to perform real business actions instead of simply answering questions.
In our next guide, we'll connect Vapi to a backend using Function Calling, allowing your assistant to interact with external systems and automate business workflows.
You'll learn how to:
- • Book appointments automatically
- • Check staff availability
- • Create CRM records
- • Send emails and SMS messages
- • Cancel or reschedule appointments
- • Trigger custom backend APIs
- • Build production-ready business workflows
This transforms your AI receptionist from an information provider into an AI employee capable of completing real tasks.
Continue Learning
If you're interested in building more AI-powered business solutions, explore these implementation guides from Weblianz Solutions:
- • How to Turn Your SaaS Idea into a Working Product Using AI
- • How to Build an AI Customer Support Chatbot for Your Website
- • How to Build an AI LinkedIn Post Generator Using OpenClaw
- • How to Create a Slack Bot to Automate Messages Using MiniMax
Need Help Building an AI Voice Assistant?
At Weblianz Solutions, we help startups and businesses build intelligent AI-powered applications, customer support systems, AI receptionists, and business automation solutions using modern technologies.
Whether you need a simple AI receptionist or a fully integrated voice assistant connected to your CRM, calendar, booking platform, or internal APIs, our team can help you design, develop, and deploy a production-ready solution tailored to your business.
Ready to build your AI solution?
Visit
https://weblianz.com
or contact our team to discuss your project.
Final Thoughts
Building an AI voice assistant is no longer limited to organizations with dedicated AI teams. Platforms like Vapi make it possible for developers, startups, and businesses of all sizes to create intelligent phone assistants using modern AI models and realistic voices without managing complex infrastructure.
The key to a successful AI assistant isn't just selecting the right model or voice. It's writing a clear system prompt, testing real conversations, reviewing transcripts, and continuously refining the assistant based on customer interactions.
As you become more familiar with Vapi, you can extend your assistant using Function Calling, CRM integrations, appointment scheduling, outbound calling, and other advanced automation features. Start with a simple assistant, learn from real conversations, and gradually evolve it into a valuable member of your team.
We hope this guide helped you build your first AI voice calling assistant. If you have any questions or would like help implementing an AI solution for your business, feel free to reach out to the team at Weblianz Solutions.