


Customer expectations have changed significantly over the last few years. Whether someone wants to ask about your services, request a quote, check pricing, or simply get in touch with your team, they expect an instant response. Delayed replies often result in lost leads and missed business opportunities.
An AI customer support chatbot helps businesses provide immediate assistance by answering customer questions, guiding visitors through their services, collecting lead information, and remaining available 24 hours a day, seven days a week.
In this guide, we'll build a fully functional AI customer support chatbot and integrate it into a website using Botpress. We chose Botpress because it offers 100 free AI conversations every month, extensive customization options, AI-powered conversations, and an easy onboarding experience without requiring you to build an AI system from scratch.
By the end of this guide, you'll have an AI chatbot running on your website that can assist visitors, answer common questions, and help generate more qualified leads.
If you're already familiar with AI chatbots and want to jump directly into the implementation, you can skip the introduction and start from Step 1 – Create Your Botpress Account.
Jump to Step 1 → AI chatbots help businesses provide instant customer support around the clock.
Why Every Business Needs an AI Customer Support Chatbot ➤
Customer support is no longer limited to business hours. Visitors expect answers whenever they visit your website, regardless of the time or day.
An AI chatbot can help your business by:
- • Providing instant customer support 24/7
- • Answering frequently asked questions automatically
- • Reducing repetitive support requests
- • Capturing and qualifying new leads
- • Guiding visitors to the right products or services
- • Improving customer satisfaction
- • Allowing your support team to focus on more complex conversations
Whether you run a startup, SaaS platform, eCommerce store, or service-based business, an AI chatbot can significantly improve your customer experience while reducing operational costs.
Why We Chose Botpress ➤
There are many AI chatbot platforms available today, including Intercom, Tidio, Chatbase, Zendesk AI, and custom AI implementations.
For this tutorial, we're using Botpress because it provides an excellent balance between AI capabilities, customization, pricing, and ease of setup.
100 Free AI Conversations Every Month ➤
Botpress offers 100 free AI conversations each month, making it an excellent choice for learning, testing, and deploying customer support chatbots before upgrading to a paid plan.
This allows businesses to experience AI-powered customer support without making an upfront investment.
Complete Chat Widget Customization ➤
Your chatbot should feel like part of your website—not a third-party plugin. Botpress allows you to customize almost every aspect of the chat experience, including:
- • Brand colors
- • Welcome message
- • Chat launcher
- • Company logo
- • Avatar
- • Widget position
- • Suggested questions
- • Overall appearance
This creates a consistent experience that matches your brand identity.
Automatic Website Understanding ➤
One of the biggest advantages of Botpress is that it can analyze your website after you provide your domain.
Instead of manually creating hundreds of question-and-answer pairs, the AI can use your website's publicly available content to understand your business, services, and customer information.
As your website grows, you can refresh your chatbot's knowledge so it continues providing accurate responses based on your latest content.
AI-Powered Customer Conversations ➤
Botpress is much more than a simple FAQ chatbot. It can:
- • Answer customer questions naturally
- • Explain your services
- • Recommend suitable solutions
- • Capture customer details
- • Qualify leads
- • Transfer conversations to your team when needed
This allows businesses to automate repetitive conversations while maintaining a professional customer experience.
Works with Existing Websites ➤
Botpress can be integrated into virtually any website, including:
- • Next.js
- • React
- • Shopify
- • WordPress
- • WooCommerce
- • Laravel
- • PHP
- • Custom websites
This means you don't need to rebuild your existing website to start using AI-powered customer support.
Step 1 – Create Your Botpress Account ➤
Visit the Botpress website and create a free account. Sign Up →
Enter your basic information along with the correct domain of your website, SaaS platform, online store, or business website. Botpress uses this information during onboarding to better understand your business.
Don't spend too much time configuring every option during onboarding. Almost everything can be edited later from your Botpress dashboard.
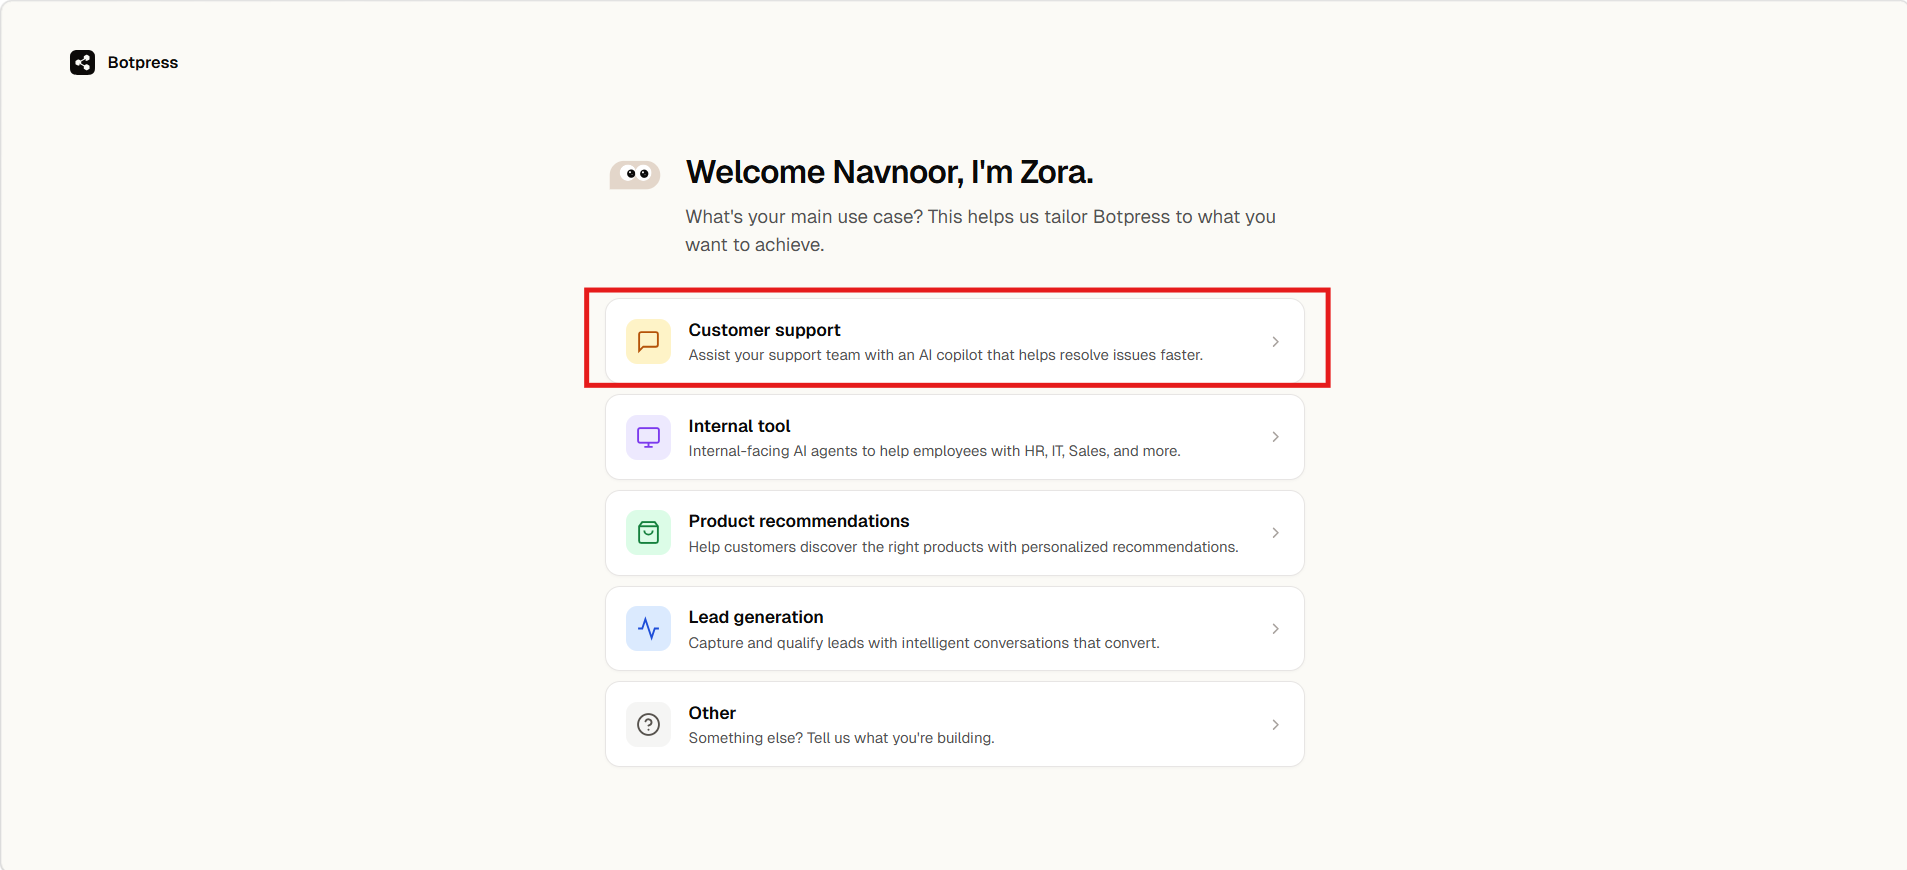 Figure 1. Create your free Botpress account.
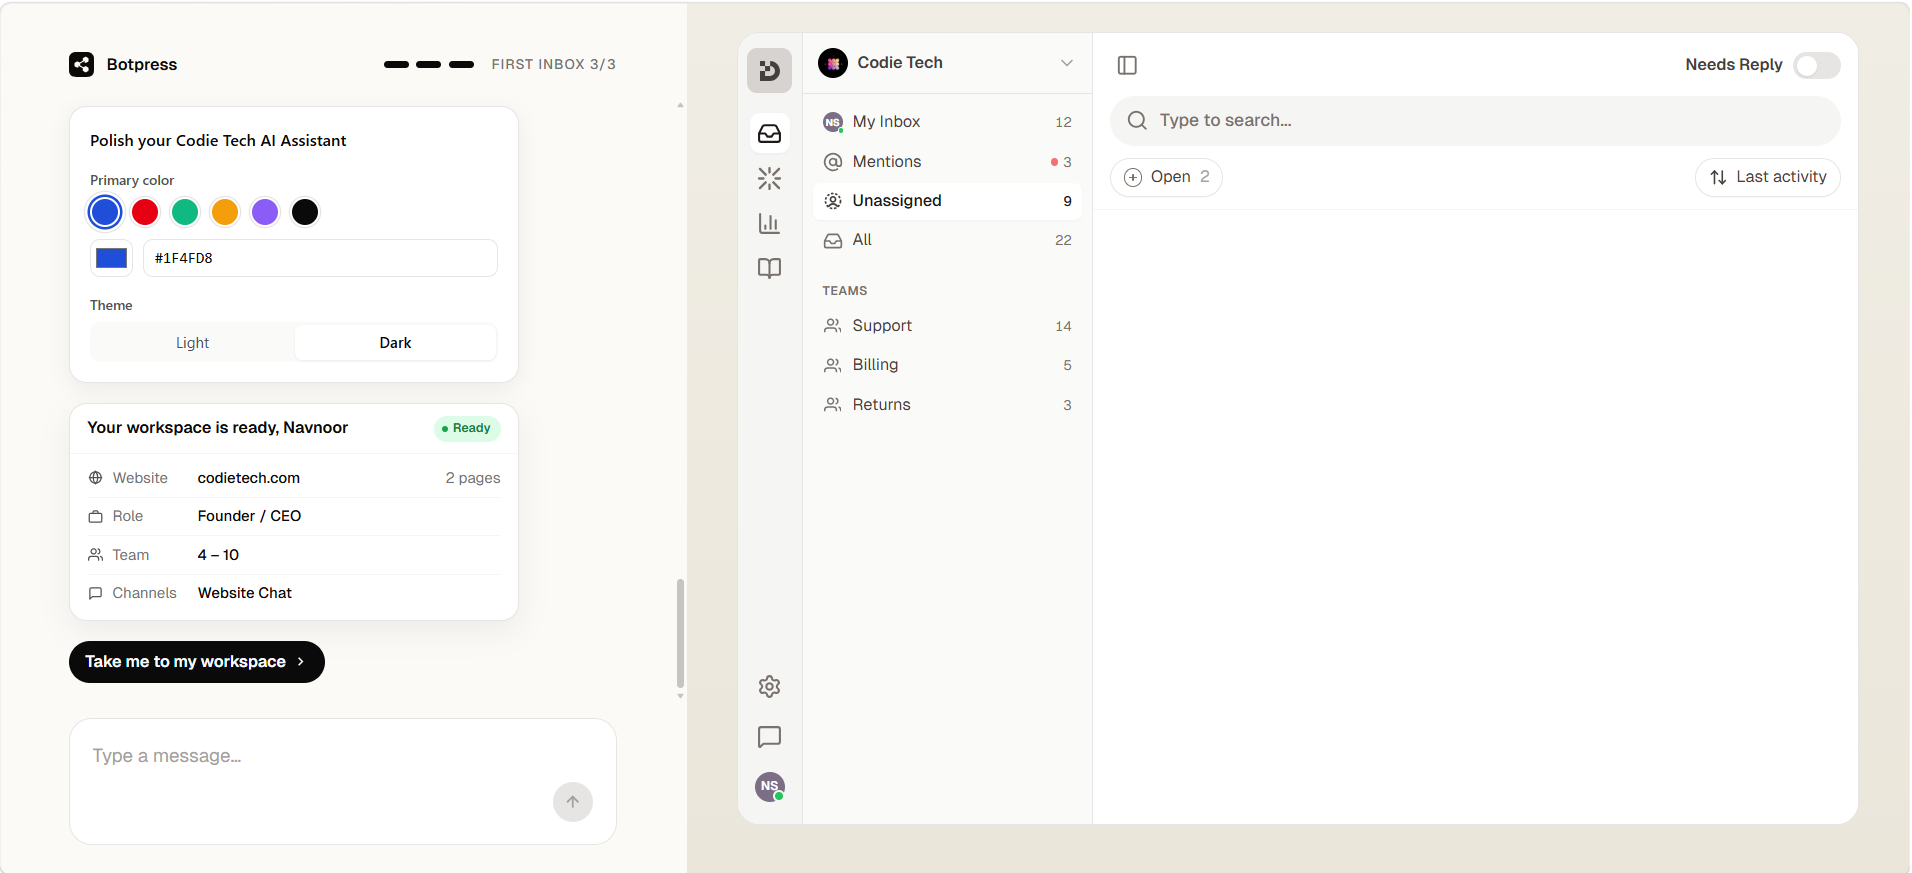 Figure 2. Complete the onboarding process using your business information.
After onboarding, you'll be redirected to your Botpress dashboard. Before continuing, verify your email address by clicking the Verify Email button displayed at the top of the page.
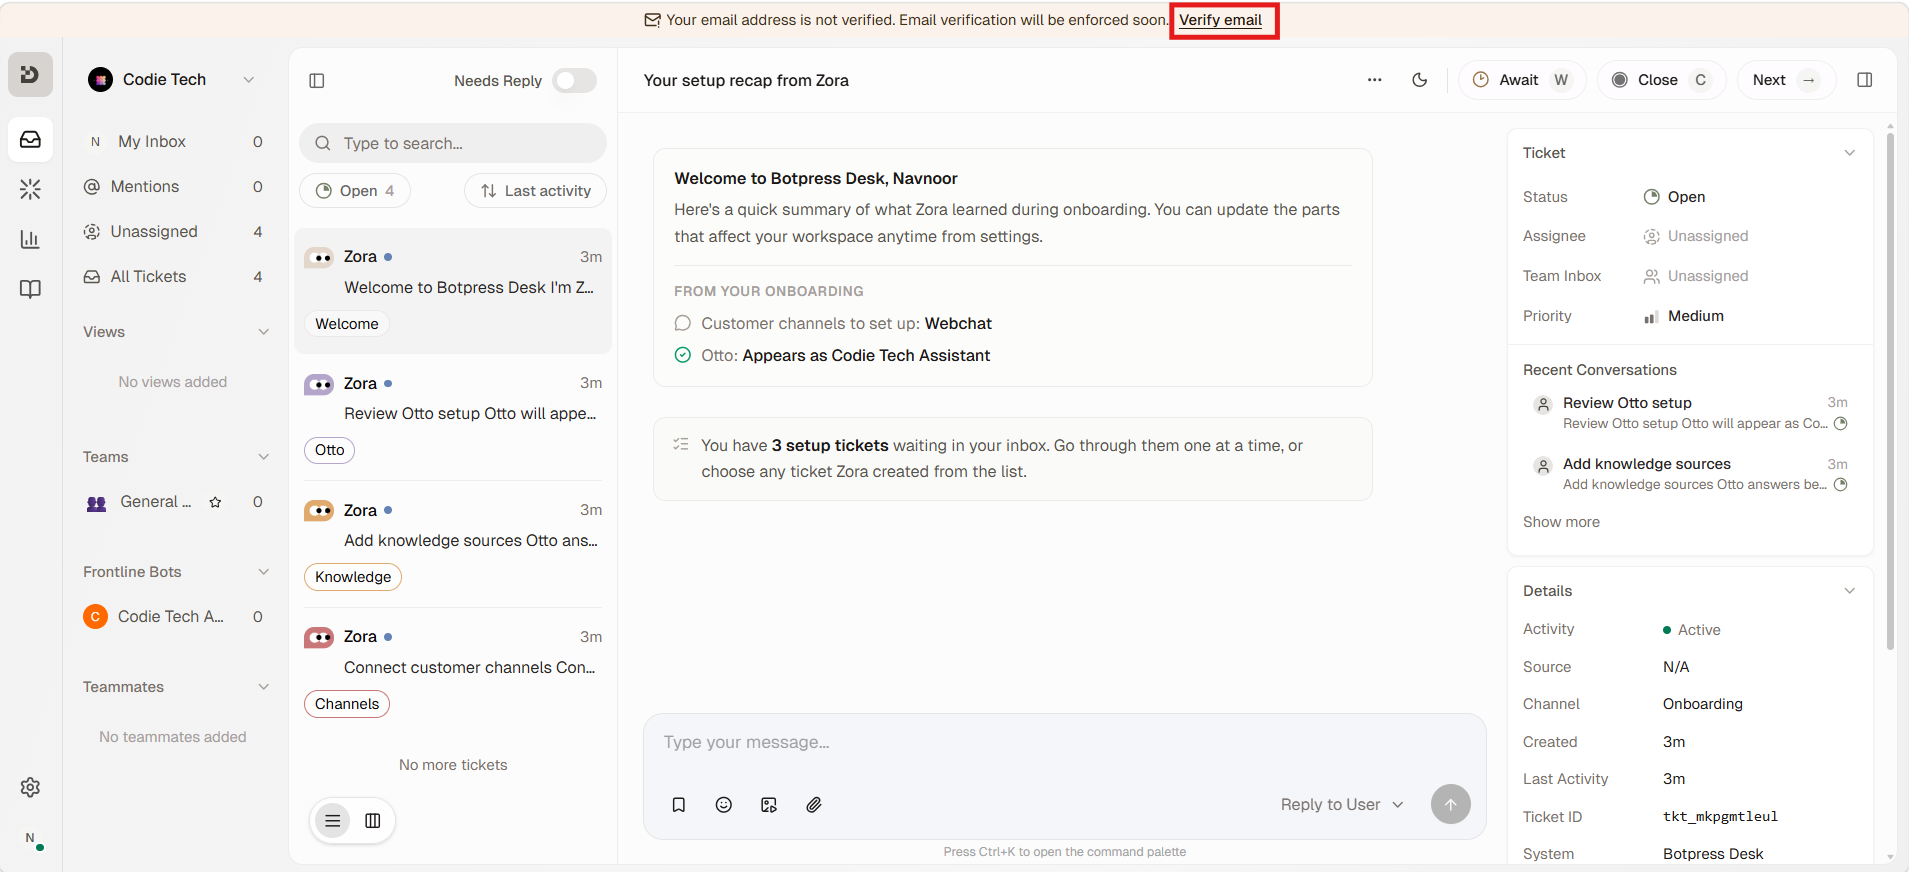 Figure 3. Verify your email address.
After verifying your email, you'll be redirected back to your Botpress workspace. Open the assistant that was automatically created during onboarding.
Your workspace acts as a central dashboard where you'll manage your chatbot, integrations, analytics, automations, conversations, and future updates.
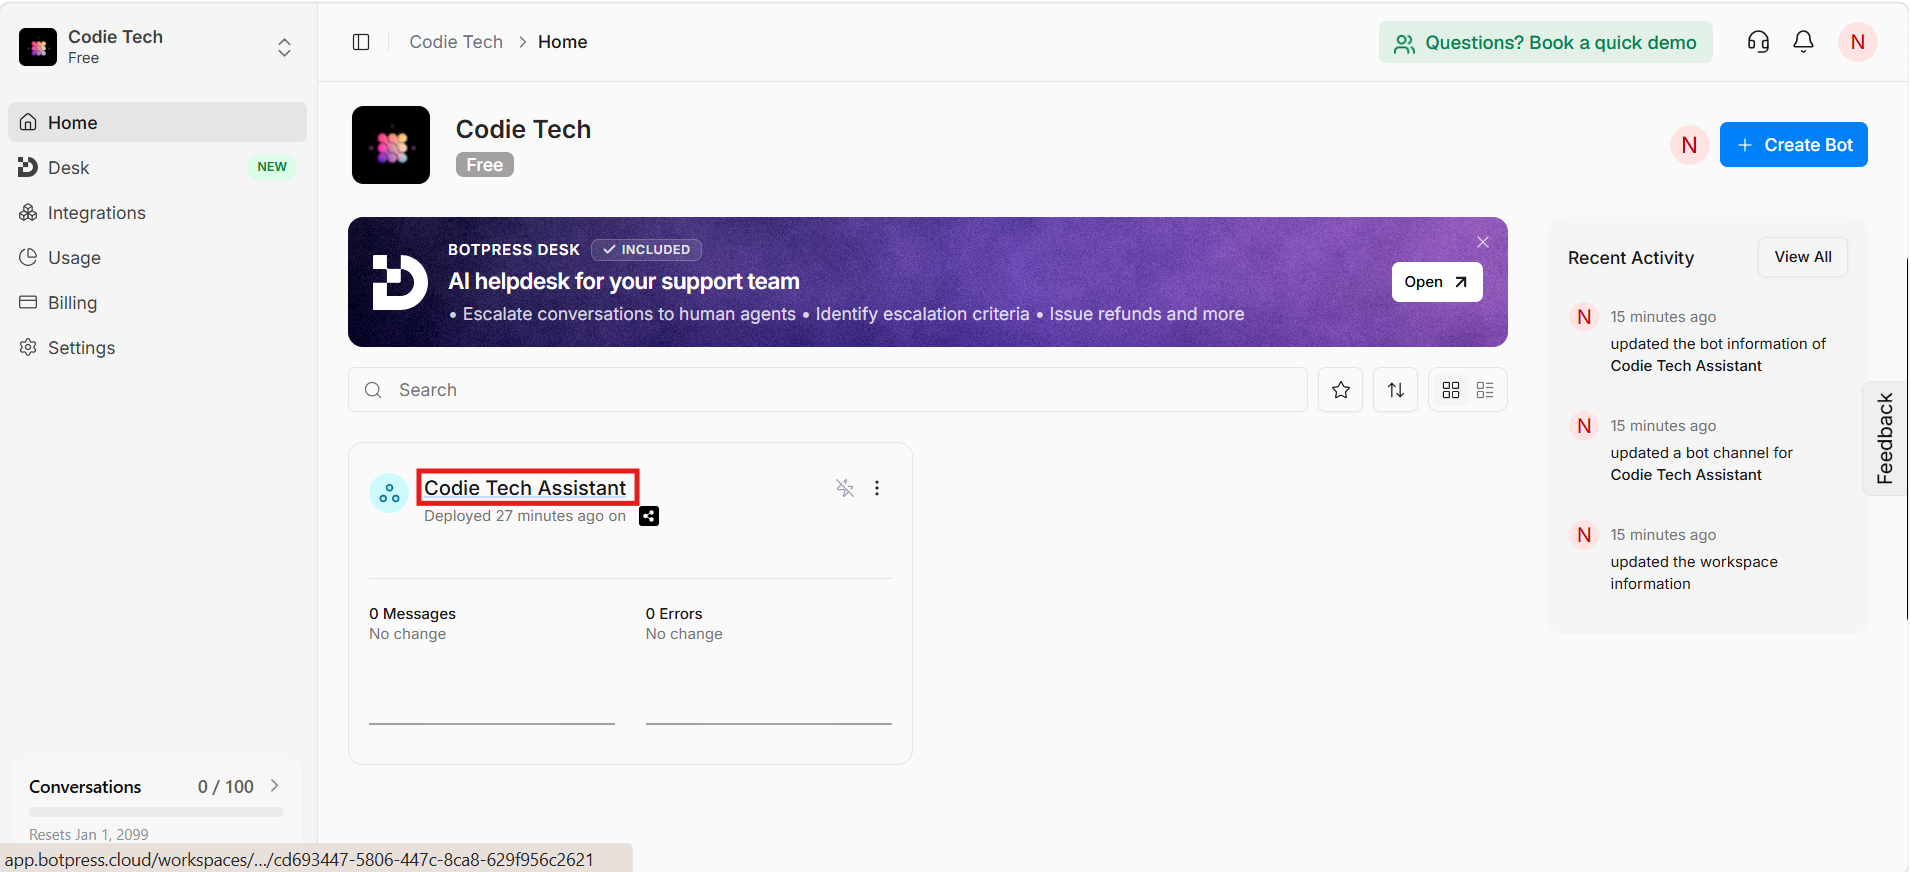 Figure 4. Open the assistant created during onboarding.
Step 2 – Configure Your AI Chatbot ➤
After opening your assistant, you'll be redirected to the chatbot configuration page.
Navigate to the Integrations tab from the left sidebar. Search for Webchat using the search box, then click on the Webchat integration card.
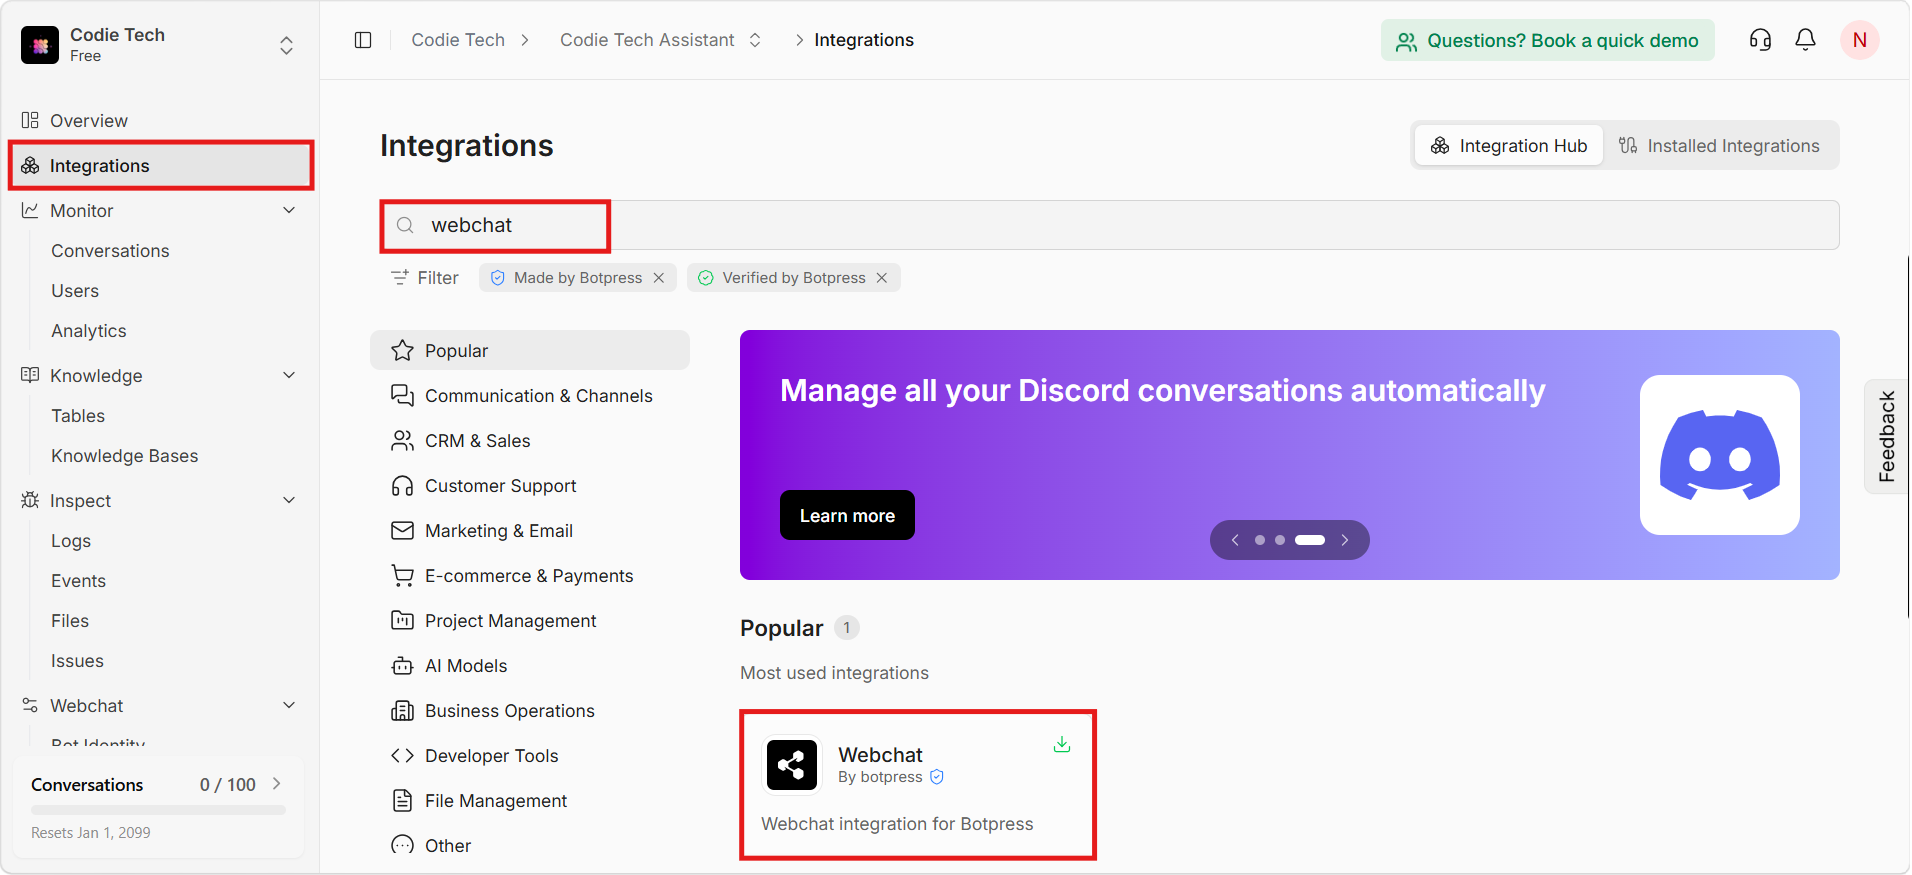 Figure 5. Open the Webchat integration.
Click on the Configure Webchat button to begin customizing your chatbot.
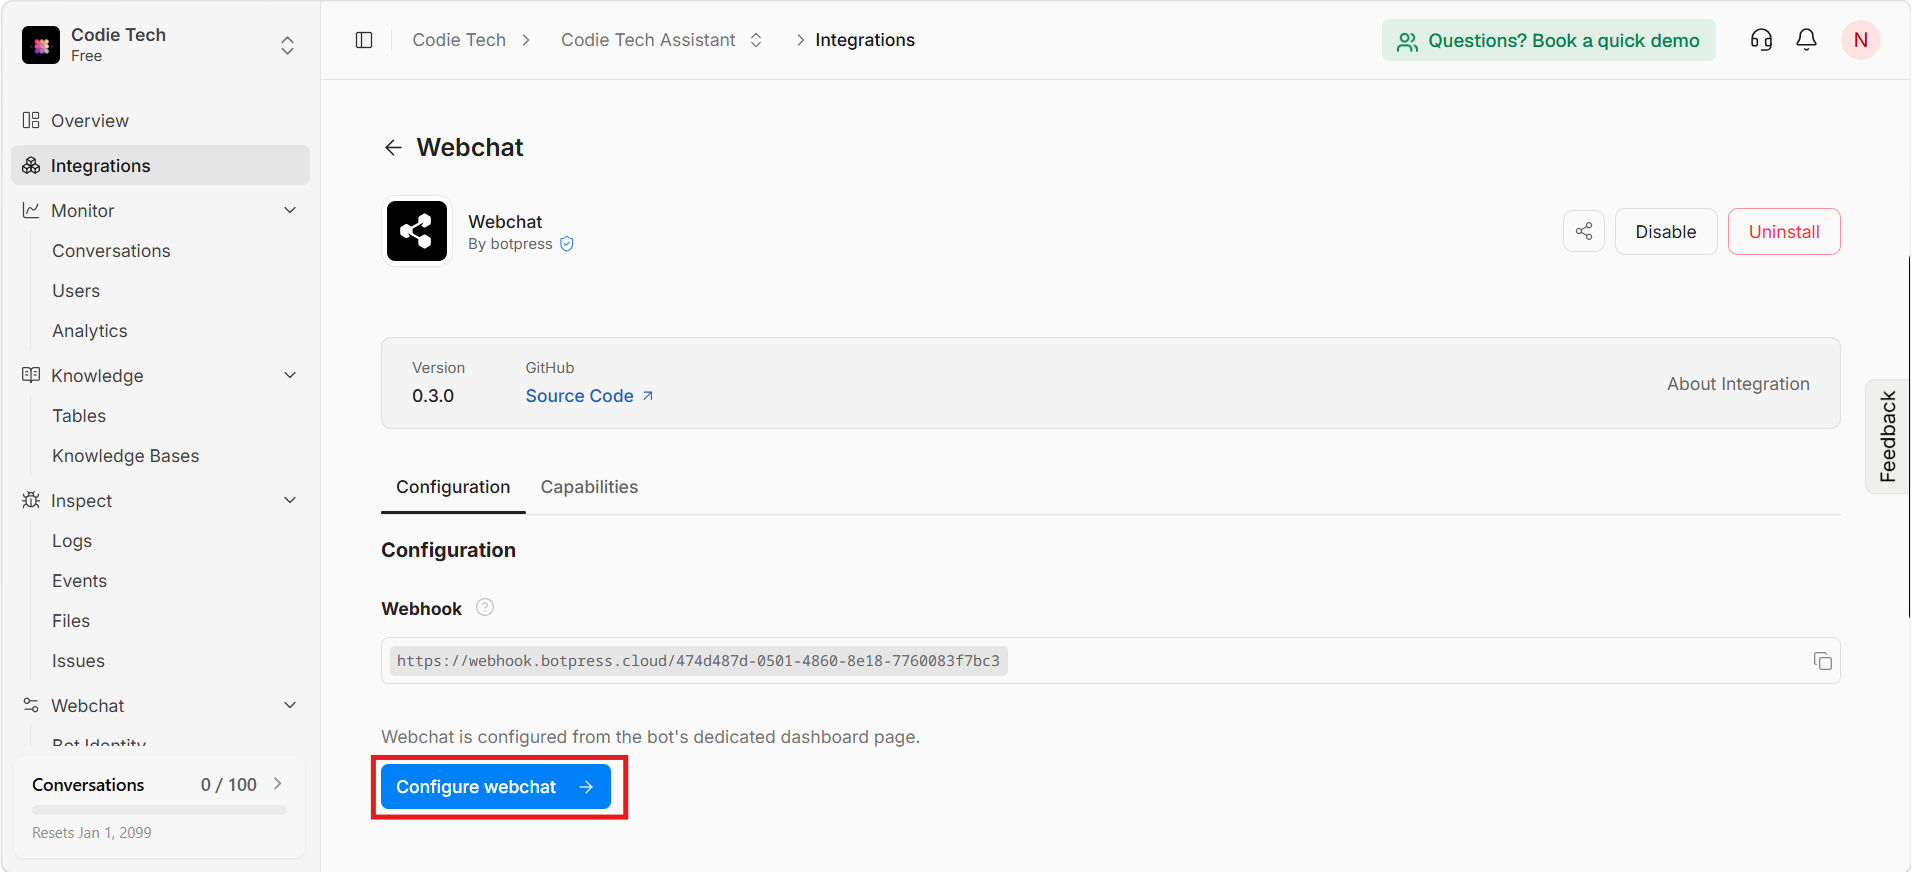 Figure 6. Configure your chatbot.
Give your chatbot a meaningful name that represents your business.
Example Chatbot Name
Example Description
Once you're satisfied with the chatbot name and description, click Publish Changes to save your configuration.
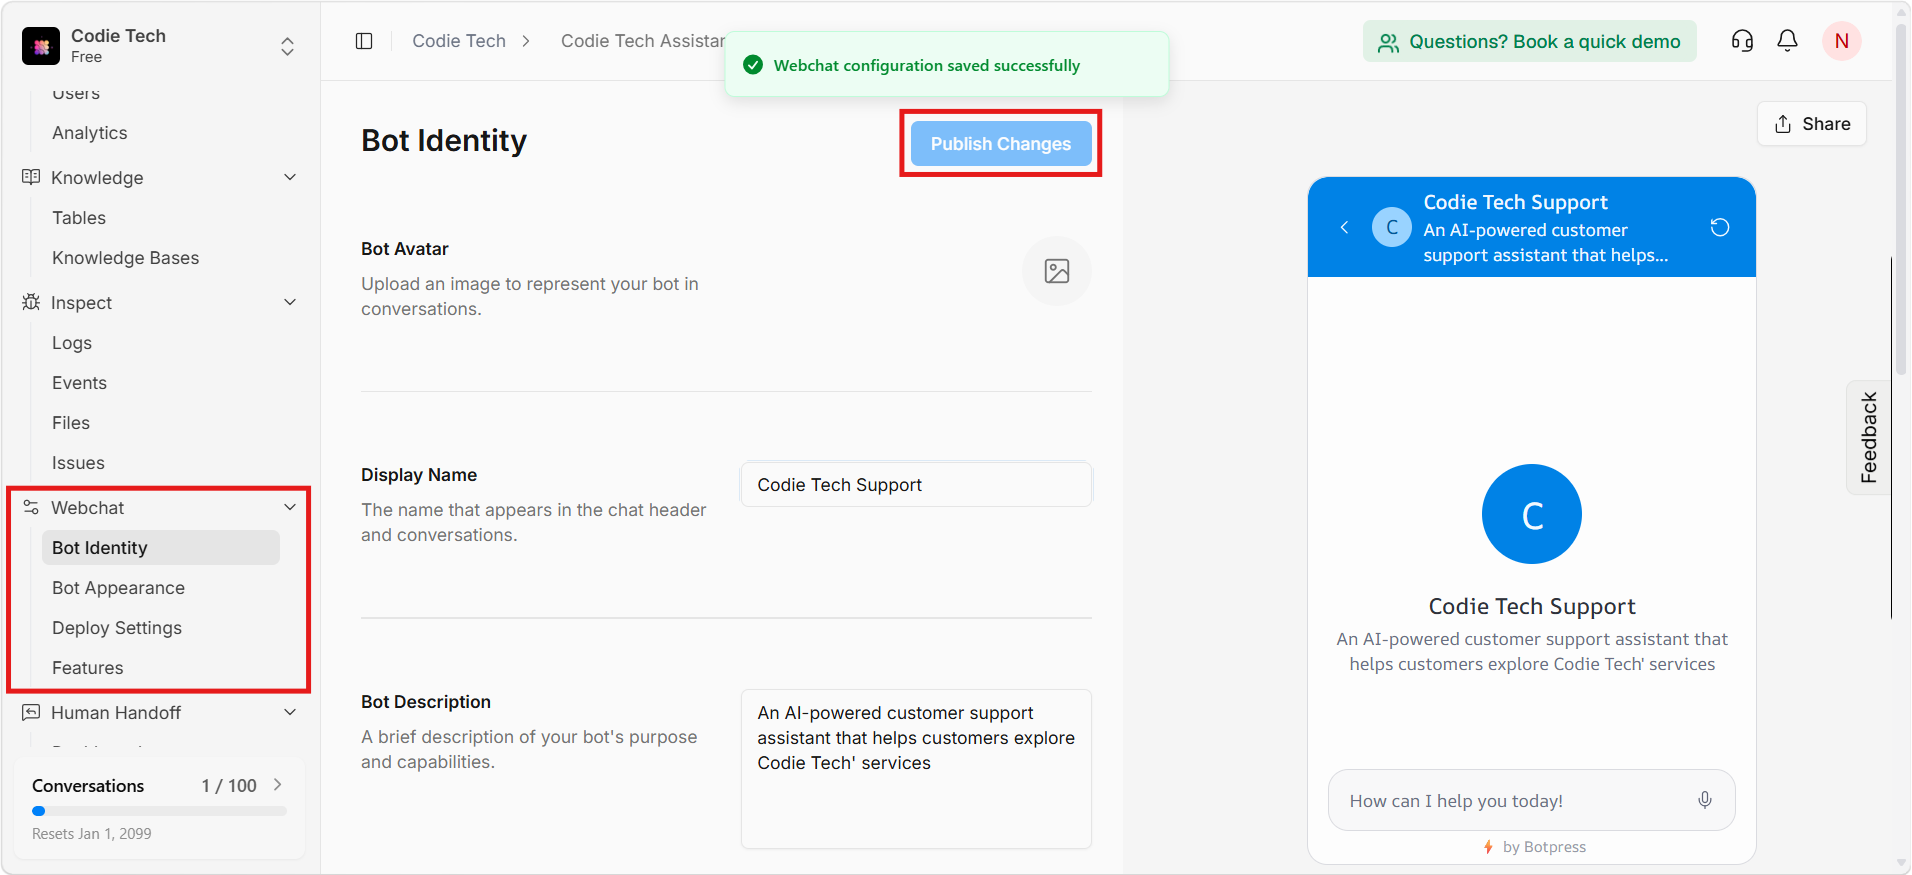 Figure 7. Publish your chatbot configuration.
Step 3 – Customize Your Chatbot ➤
Before adding the chatbot to your website, customize its appearance so it matches your branding. A well-designed chatbot creates a better first impression and improves customer trust.
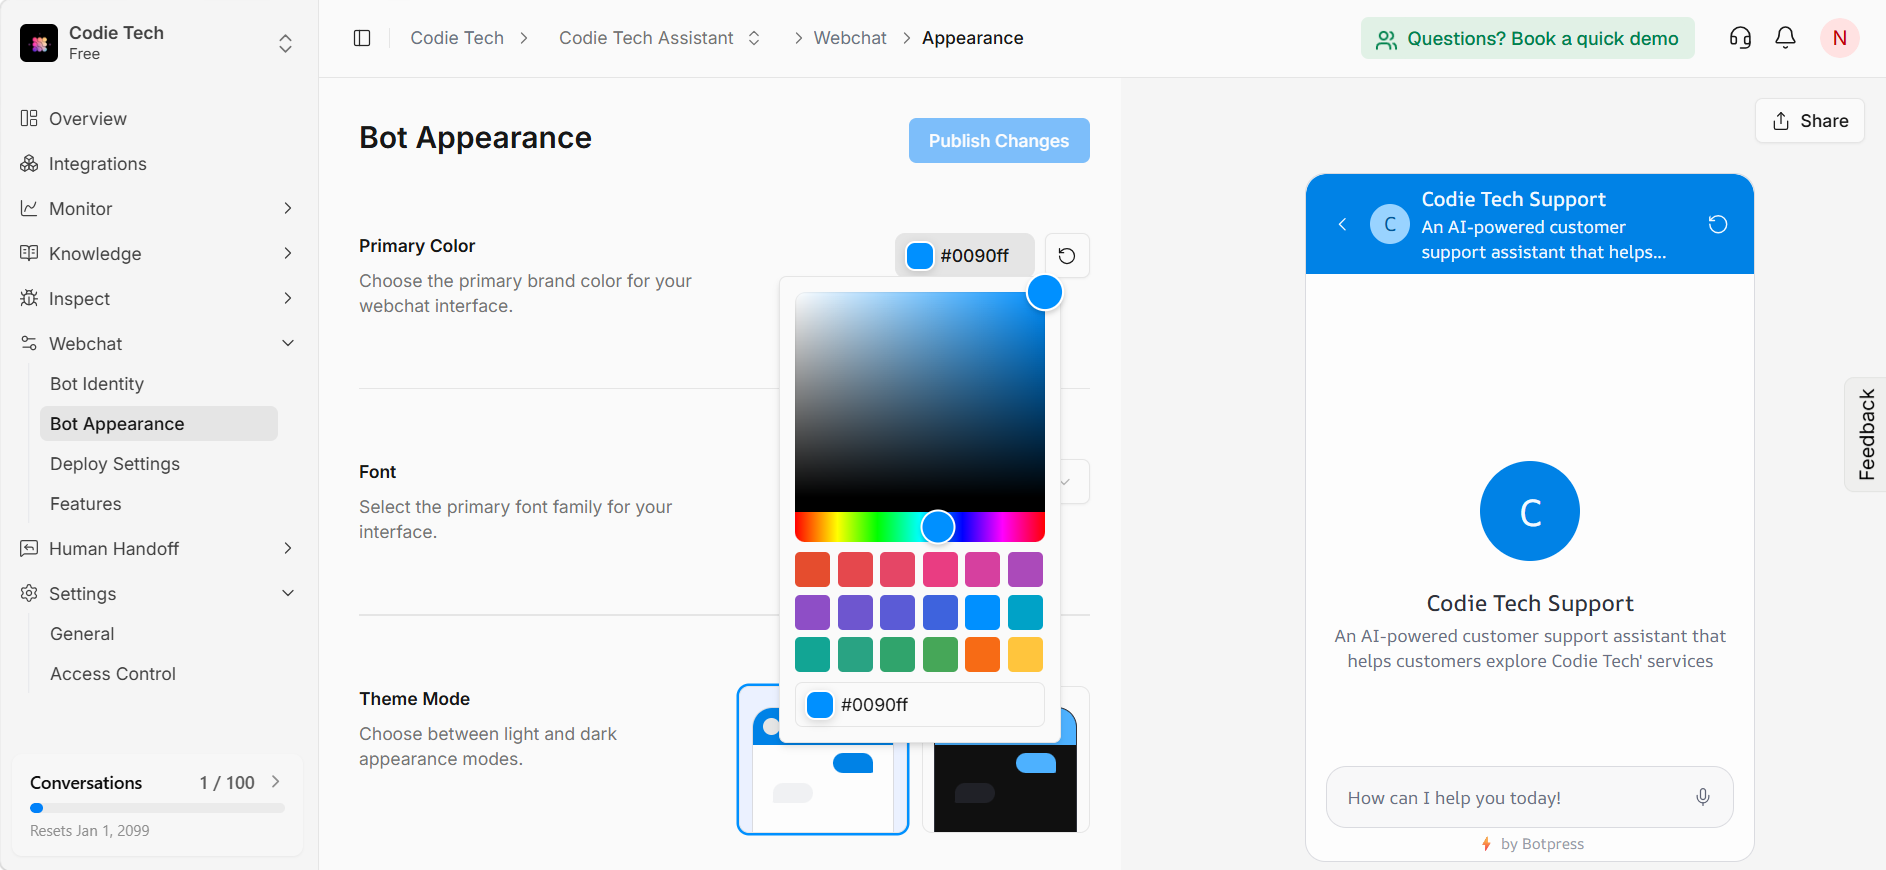 Figure 8. Customize your chatbot before integrating it into your website.
We recommend configuring the following settings:
- • Company logo
- • Brand colors
- • Chat launcher
- • Welcome message
- • Avatar
- • Chat position
- • Suggested questions
Once you're satisfied with the appearance, you're ready to integrate Botpress into your website.
Step 4 – Integrate Botpress into Your Next.js Website ➤
Once your chatbot has been configured inside Botpress, it's time to integrate it into your Next.js application.
Navigate to the Webchat integration and copy the generated JavaScript snippets shown below.
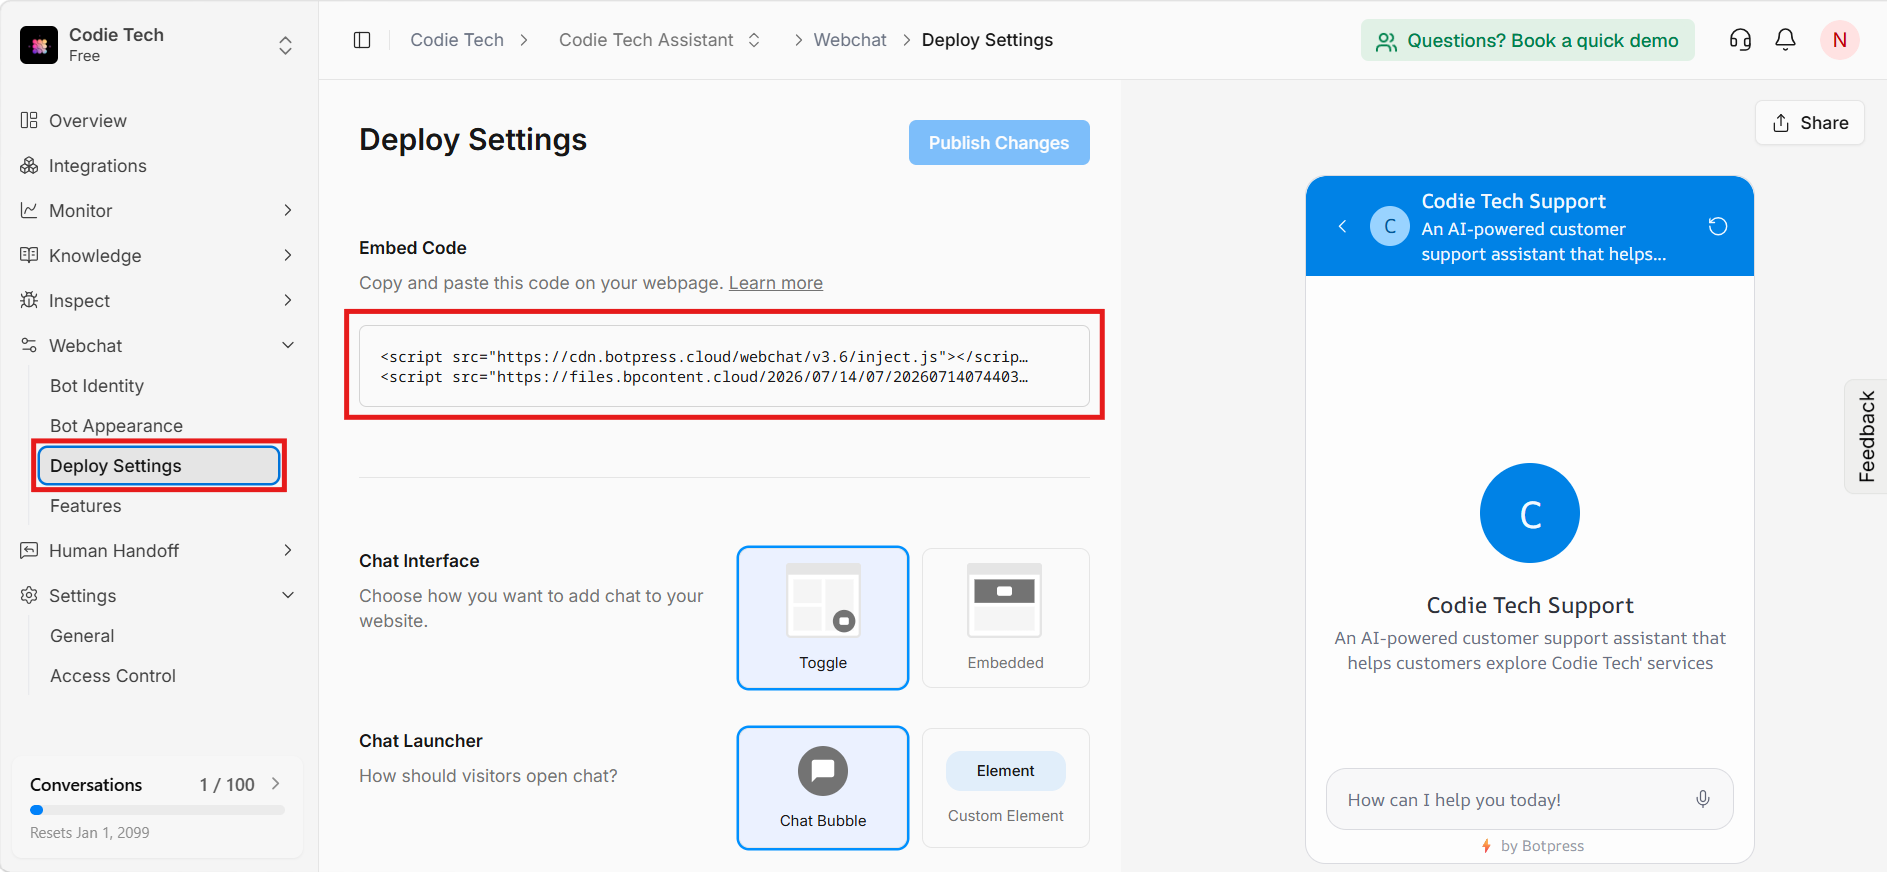 Figure 9. Copy the generated Botpress Webchat scripts.
<script src="https://cdn.botpress.cloud/webchat/v3.6/inject.js"></script>
<script src="YOUR_WEBCHAT_CONFIGURATION.js" defer></script>
Instead of adding these scripts directly into your HTML, create a reusable component inside your Next.js project.
Create:
components/BotpressChat.tsxAdd the following code:
"use client";

import Script from "next/script";

export default function BotpressChat() {
  return (
    <>
      <Script
        src="https://cdn.botpress.cloud/webchat/v3.6/inject.js"
        strategy="afterInteractive"
      />

      <Script
        src="YOUR_WEBCHAT_CONFIGURATION.js"
        strategy="afterInteractive"
      />
    </>
  );
}
Replace YOUR_WEBCHAT_CONFIGURATION.js with the configuration script generated by Botpress.
Step 5 – Load the Chatbot Across Your Website ➤
Import the chatbot component into your application's root layout.
Open:
app/layout.tsxImport the component:
import BotpressChat from "@/components/BotpressChat";Then add it inside your <body> element.
<body>
  {children}
  <BotpressChat />
</body>
This ensures the chatbot is available across your entire website.
Step 6 – Verify the Installation ➤
Start your Next.js development server:
npm run devOpen your website and confirm the Botpress widget appears in the bottom-right corner.
Ask a few questions such as:
- • What services do you offer?
- • Do you build Shopify stores?
- • How can I contact your team?
If the chatbot responds correctly, your integration has been completed successfully.
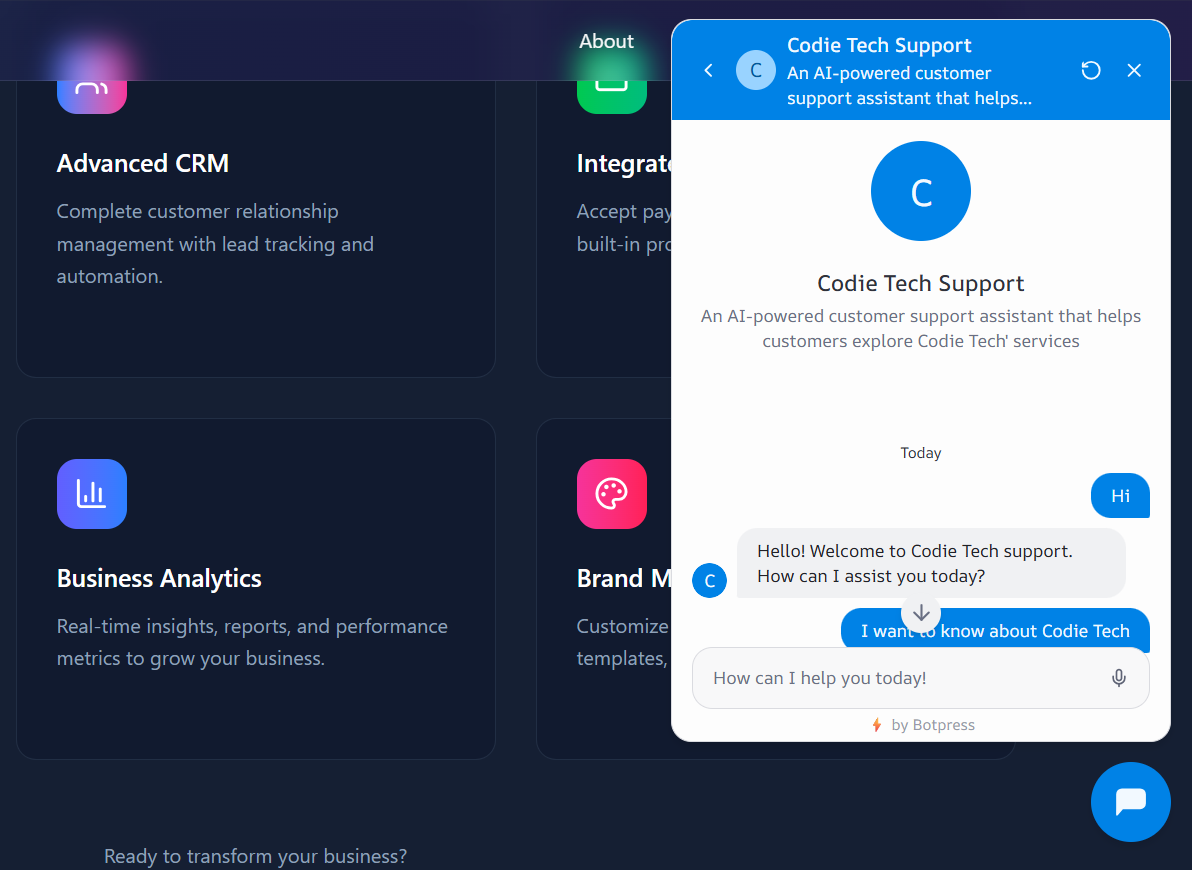 Figure 10. Botpress chatbot successfully running on your Next.js website.
Final Thoughts ➤
Building an AI customer support chatbot is no longer a complex or expensive process. With Botpress, you can create, customize, and deploy an intelligent chatbot within minutes without building an AI system from scratch.
Its free monthly conversations, website understanding, customizable interface, and simple Next.js integration make it an excellent choice for businesses looking to improve customer support and lead generation.
If you need help integrating AI chatbots into your website, SaaS platform, Shopify store, or custom application, feel free to contact Weblianz Solutions. Our team can help you build, customize, and deploy an AI assistant tailored to your business requirements.